Showing posts with label Christmas Present Ideas. Show all posts

Friday, April 19, 2013

DIY Family Genealogy and History Calendar


We like to give home-made presents in our family each year for Christmas, so have collected quite a few ideas for DIY gifts over past years.  One idea that pops up regularly in different forms, is a family calendar.  I'll do another post sometime, showing some of our other family calendar versions, but this particular one has a  Family History theme.  

Although a calendar about your genealogy can take a while to put together, once it's completed it can be printed off for as many people as you think would like to receive it.  I also think it's a wonderful family resource and keepsake, and the information quite fascinating when it's your family being written about.   

I'm posting about this now, rather than closer to Christmas because you may want to get a head start on collecting and inputting the information you will need, if this idea appeals to you.


This is the front cover of the calendar.  I constructed each of the calendar pages on the computer using Publisher, then printed them out double-sided (a family history page on the top and a calendar month page below), on A4 paper, using our home printer.  I've used protective clear plastic covers on the front and back, then bound all the pages into booklet form using our home binder.  (You could get all of that done at Office-works if you prefer.)  Although it isn't shown on these pages, we finished off each calendar by punching a hole through the top centre of each page to allow it to hang from a hook.

You'll find a selection of free, downloadable calendar templates on the net that you can adjust for your calendar months.  Or compose your own calendar grid using Publisher or another program.  Although I haven't shown any of them, each facing page of these pictured pages was a grid of that calendar month, with birthdays, anniversaries, public holidays, etc, added in.


The facing page for January was this seven-generation chart above: Neil and me, our children and grandchildren, our parents, grand-parents, great-grand-parents and our great-great-grand-parents.  (Sorry about the terrible quality, but I've removed the information about living persons and fuzzied up the page for privacy.)  Where we had photos of our ancestors I have included them, along with the place and date of birth for each.  Perhaps you won't have as much information about your family history as this, but could put in whatever you do have.  It's a wonderful resource to have all this important information compiled on one page.   Although you can't see it here, I also gave each ancestor on the chart their own number (eg our children were all number 1, Neil was number 2, I was number 3, his father was number 4, etc.), which helped to match the people on the chart with the people being written about in the calendar. 

(You can click on each individual page to see it more clearly.)


I played around a bit before I finally determined upon a format for the family history pages.  There were 13 pages to do altogether, because I had calendar pages for January to December, plus January for the following year.  The seven-generation chart occupied one of those pages, leaving me with twelve facing pages still to fill.

Should I just highlight 12 individuals?  Give half a page each to a chosen individual?  You can see from the generation chart that between us, my husband and I have (like everyone has :), 4 parents, 8 grand-parents, 16 g-grand-parents, and 32 g-g-grand-parents: 50 individuals altogether, not counting Neil and me.  Of course, we had a lot more information on some of these ancestors than we did on others.  I could have written a small book on some individuals, but had barely a few lines of data about others.

As I read through the histories of the ancestors I did have some information for, it seemed to me that I was able to pick out distinguishing characteristics for many of the individuals.  Eventually I decided that nine of the pages would highlight the characteristics of some of our ancestor couples: each set of our parents; all four sets of our grand-parents; and three sets of g-grand-parents.  The remaining three pages were devoted to getting in as much information about our other ancestors as possible under the three headings: 'First Fleet and Early Pioneers to Australia'; 'House of Bedwell - Adventurers and Explorers'; and 'Academics, Artists, Writers and Musicians'. 


As a finishing touch I included a list of all the contact details - phone, email and addresses - for all of our (living) family on the inside back cover. Below is a copy of the calendar's back cover. 


It was a lot of work putting this together, but also incredibly interesting and satisfying!  Everyone loved their present, and hopefully we all knew more about our family history by the end of the year :)


How to search out your family history - 

If you would like to search out your family history, you can start as easily as by Googling an ancestor, including all of the information you already have for them. Your search will most likely take you to one of the genealogy sites such as ancestry.com, where you can search further.  FamilySearch is another site that will help you get started.

You will need to verify that you have discovered someone who is actually in your line, by matching as many details as possible - such as the names of spouse and children, before you know for sure it is them.  As you follow the threads you will start to become conversant with various census findings, military records, etc. - and to be honest, you'll probably find yourself getting completely hooked!  

One of the most wonderful things about studying out your ancestors is to find that others in your line have very likely already begun, and you can often find the information they have compiled available on the net.  This means that you will sometimes find many generations of information all from one name.   It's like the best game of treasure hunting you can imagine!  You can't know how exciting it is to track down your ancestors until you have done it!

I know this post began as a home-made Christmas present idea - and seems to have morphed into a post about genealogy instead!  But enthusiasm for genealogy is a side effect of doing your family history that you should expect to encounter too!


So, where do you come from? :)


Friday, March 1, 2013

Pattern for a Child's Carry Bag


After making some children's beanbags as Christmas presents last year, I found I had enough leftover fabric scraps to make a handy child's bag for our young grand-daughter to take to church - useful to carry some colouring-in books and crayons to keep a little one occupied.   It was a fairly quick and easy project to do :)  The pattern and directions are below.


Directions -

  • Make yourself a simple paper pattern by cutting a rectangle measuring 28cm (11") x 31cm (12") onto some scrap paper.   Cut out a small 2.5cm (1") square from the side of each bottom corner.  (See Diag 1.  This is your basic pattern for the front and back, and the 2 inside lining panels - there is a 1.5cm (3/4") seam allowance already included in the pattern all around.)


Diag. 1


  • Using the pattern you have just made, pin and cut out one back, one front, and two lining pieces, plus two pieces of lightweight iron-on pellon.  (See Diag 1 and Diag 2.  The pellon gives the finished bag a bit of padding and substance).
  • Iron the two pellon pieces to the two front and back panels.
  • Also cut two pieces of fabric 22cm (8 3/4") x 28cm (11") for the two crayon-holder panels on the back of the bag. (Not shown in Diagram)


Diag. 2


  • Cut two long pieces of fabric for the handles: 47cm (18 1/2") x 8cm (3")
  • Cut two pieces of pellon for the handles: 45cm (18") x 2.5cm(1") 
  • Mark the centre line of the handle pieces by folding, then ironing them in half lengthwise, (wrong sides facing).  Open these two handle pieces out and iron one of the pellon pieces to the wrong side of each of the long handle pieces so that one edge of the pellon is placed along the centre line.
  • Iron a 1.5cm (3/4") hem along both sides of each long handle pieces, then fold in half lengthwise, wrong sides together, encasing the ironed-on pellon, then pin the open edges together.  (You can see the long handles in Diag.1 pinned after doing this.)   
  • Top-stitch both long sides of each of the handles, catching the pellon inside and keeping the open edges aligned.  (These are your finished handles.)
  • Fold each of your two crayon-holder pieces in half, right sides facing, and sew a 1.5cm (3/4") seam along each open edge.  Turn and press.


Diag. 3


  • Position each of the crayon-holder pieces on to the back panel, matching the raw side edges, and keeping the bottom edge of the bottom piece at least 1.8cm (3/4") away from the bottom corner, (to allow for the 1.5cm seam allowance.  See Diag 3).  Sew the pieces to the panel along each raw side edge, with a 1cm (1/2") seam allowance, then sew along the bottom edge of each crayon-holder piece, to further attach it to the back panel.
  • Using a fabric-marking, water-erasable pen, (see Diag. 4), mark 5 equally spaced lines every 4cm (about 1 2/3") along each of the two crayon-holder pieces, then sew along these lines, to form the crayon pockets.  (See Diag. 3)


Diag. 4


  • Sew each of the corners on the front and back and lining panels, right sides facing, with a 1.5cm (3/4") seam.  (See Diag 5)


Diag. 5


  • Sew the two lining pieces together along the sides and bottom, right sides facing.  (See Diag 6)  Sew again to finish raw edges, then clip seam as needed in corners.  Then iron in a 1.5cm (3/4") hem along the top edge.  Set aside.


Diag. 6


  • To strengthen the bond between the front panel and the ironed-on pellon it may be advisable to quilt it in some way.  In Diag 7 you can see that I used the water-erasable pen to mark a pattern on the panel that I then top-stitched.


Diag. 7


  • If you would like to paint a name on your bag, find a font you like on your computer (or free-hand the name if you prefer) and print out the name so that it fits nicely onto the front panel.  (I used the font Curlz MT for 'Jacey'.  I played around with it, and ended up with something like font size 220 for the letter 'J' and font size 130 for the rest of the letters.  To see what suits you, try holding or taping your panel up to the screen of the computer, where you will be able to lightly see the name through the panel - see Diag 8.  Adjust to suit yourself.  Diag 9 also shows this method, on a different project.)  Print out the name in the correct size, then pin it the the panel in the correct position, (see Diag 10), with some dressmaker's carbon paper (see Diag 11), in between.  Use a pen to transfer the letters to your panel, then remove the paper and carbon and use puff paint (see Diag 12 and Diag 13), to paint the name.   Allow to dry flat.  (A blow-dryer can speed drying.)  


Diag. 8


Diag. 9


Diag. 10


Diag. 11


Diag. 12


Diag. 13


  • Sew front and back panels together along sides and bottom of bag, right sides together.  (See Diag 6)  Finish seam, turn right side out, then turn under a 1.5cm (3/4") hem along the top raw edge and press.
  • Fit the lining bag inside the almost finished outer bag and match turned-under, ironed hem edges together.  Position handles, then pin them to the bag and pin along the top edge.  Top-stitch once all around the top of the bag, close to the edge, taking care to catch the handles and the two turned-under edges.  Top-stitch once more, about .5cm (1/4") away.  Your bag is almost finished!
  • Using a needle and thread, handsew a few stitches to hold the lining and the outer bags together in the bottom two corners, then perhaps about half way down the side seams.  This will keep the lining in place inside the bag.
  • The fabric-marking pen and any smudges made by the fabric carbon paper will erase easily with a little water.


Now you are finished!  


Thursday, November 15, 2012

Homemade Christmas Present Idea: Ribbon Wands


http://www.bakersfieldmom.com


Last year I made a bunch of ribbon wands for Christmas gifts for our girls and a bunch of cousins.  They were really sweet and quick and easy to make! The oldest cousin I gave one to was I think 11.  I guess I'm partial to them because I did rhythmic gymnastics for a while growing up, so I think they're awesome :)  Our girls play with theirs all the time.


Materials:
  • Wooden dowels (allow about a foot in length per wand) - got these from Spotlight
  • Thick Satin Ribbon (I used ribbon that was 5cm thick for most of the wands, 4cm for the wands I did for the 1 year olds like Ana.  I bought lengths that were 3m long for the bigger cousins which was a nice length, and I think Ana's is only 2m long - easier for the little ones to play with without knotting it up)
  • Eye-hooks (these are something used for blinds or curtains or something?!  It took the ladies at spotlight a little minute to figure out what I was after, thank godness I knew what they looked like!...)  You bought them seperately for a few cents each :)


  • Fishing swivels (yeah.. weird.  AND my first real sojourn into Anaconda.  But they're the secret to making the ribbon wands get the movement they really need!!  So there I was in the fishing section, choosing the most flexible and aesthetically pleasing kind of 'barrel swivel' I could find :))  Here are the ones I settled on...

  • Optional: paint/wood stain
  • Needle and thread the colour of your ribbon-ish (Okay, if it's going to annoy you, you'd better find a thread the EXACT same colour of your ribbon... I always kind of like that my thread's a tiny bit darker or lighter than the fabric I'm using... and still wondering why I do not celebrate a great deal of sewing success!! :))

How to make them:

1.     Cut the dowel to size.  I (haha - okay, James) cut most of the pieces about a foot long, but did a couple of smaller pieces for the babies.  For example the one we made for Ana was only 9 inches, or about 23cm long.
2.     Paint/stain the dowel.  We just stained ours (okay, James did this bit for me too :)) using leftover wood stain from some shelves a couple of years ago.  Here's the before/after wood:
3.     I'm sure I could have managed steps 1 and 2 myself, but James was happy to participate in making the gifts, which was nice... plus he took the wood to work and cut it on some big machine and it took 2 seconds...

4.     Screw in the eye-hooks, into the centre of one end of the piece of dowel - I ended up needing to use pliers or something to turn the eye-hook near the end, to make sure it was in nice and tight!

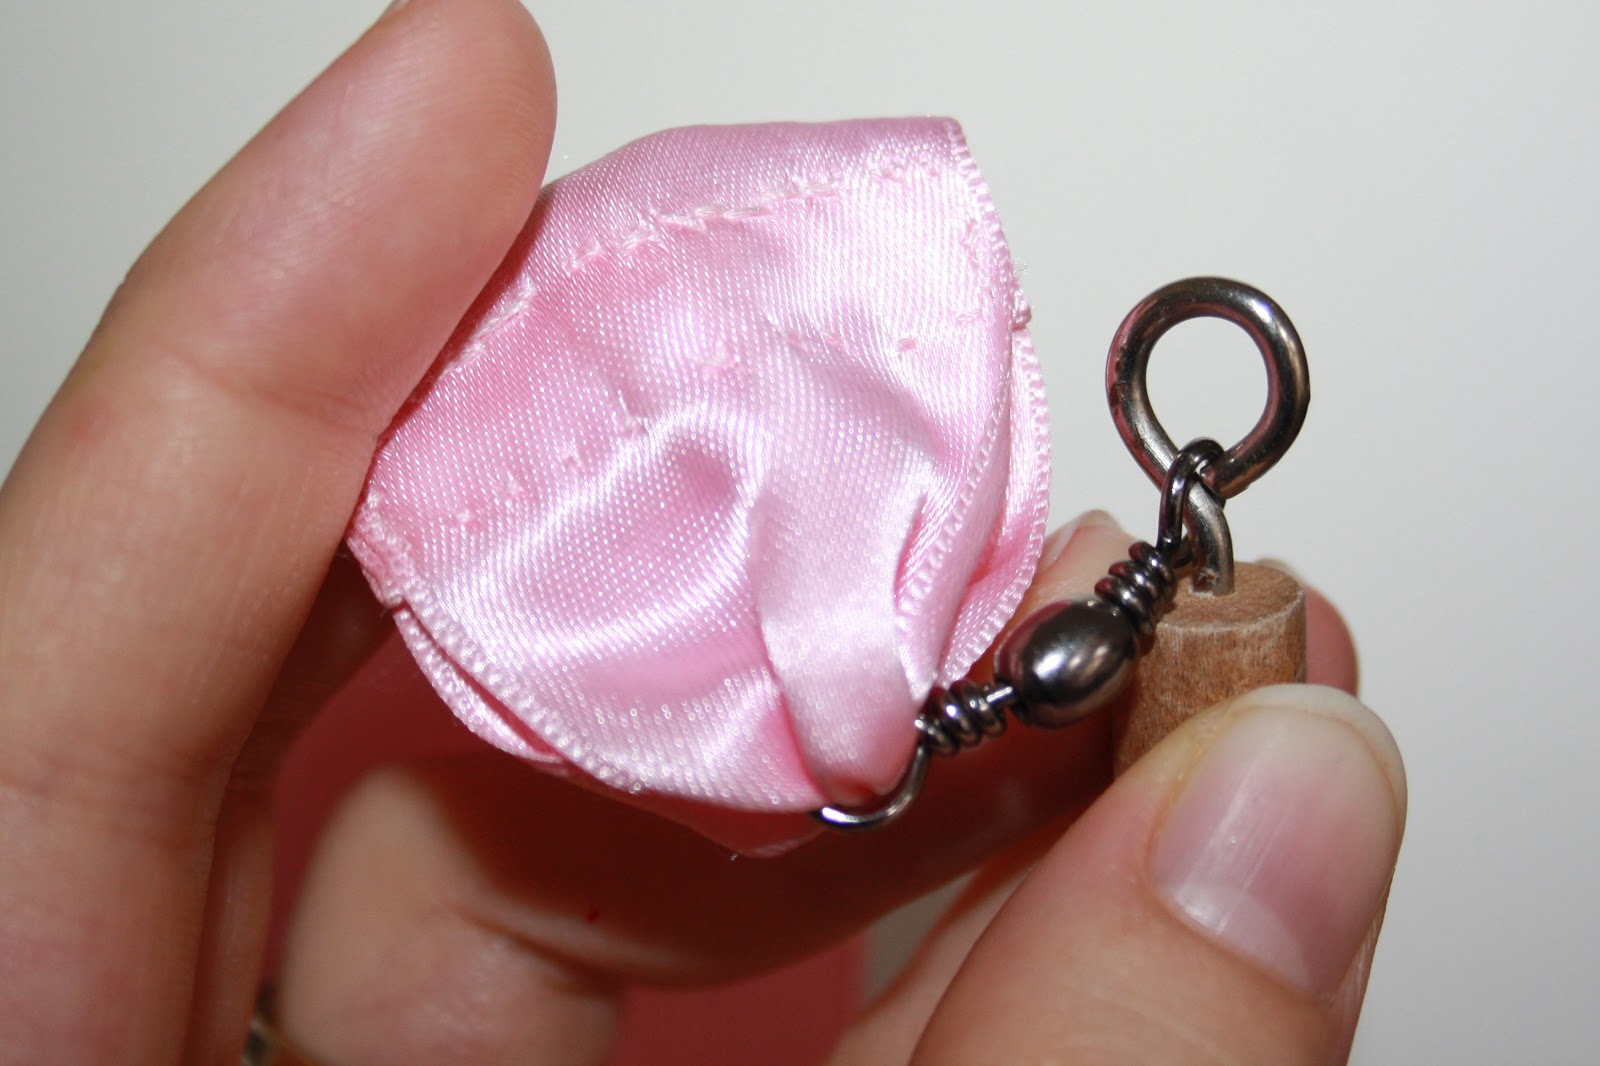
5.     Slip one end of the swivel onto the eye-hook, and close the eye hook up again nice and tight again with pliers or something (okay, I admit, James did this too...but again, it's all doable - I was just keen to get him on board Christmas-ing! :))


6.     Get out your ribbon!!  This is the bit that I really enjoyed, partially I guess because I actually DID this bit, but also because it's kind of nice and therapeutic to do a little hand sewing every now and then! Especially if it really is just a little.. :) I threaded the ribbon through the loose end of the swivel, and then I folded the end over a couple of times, then sewed it together.  I folded it over a few times so it wouldn't fray.. and then I sewed it all around the folds, as you can see in the pics.  My sewing is nothing special at all (except for therapeutic for me!), and looks kind of awful I guess, but you can't tell unless you're taking close up photos to put on your blog (sigh) :)  I'm sure you could do this and maybe make it look a little more professional!! :) 


7.    Grab a match/candle/lighter/whatever brand of fire you like, and burn the end a little to seal it and so it doesn't fray! :)


And you're done!! :)  Simple, cute and a lot of fun!!!  Hopefully whoever you're sewing it for, loves it as much as my little one does! :)


Tuesday, October 23, 2012

The Best Dress-Ups!


Although I wrote here that I don't much like shopping, the truth is that I recently spent some very happy moments purchasing not just one or two, but..  (ok, I don't really want to count them up because it might have been a lot) - perhaps I'll just admit to several gorgeous complete outfits with all the trimmings.  And you should be imagining full-length confections perfectly suitable for a princess and the occasional fairy or two, because I'm talking dress-ups!  With Christmas coming up you might have a daughter, niece, grand-daughter or friend who would love these too..   ?


      Traditional Cinderella Bundle 


With five little girly grandchildren aged four and under, you can believe that dress-ups had already re-entered our lives in recent months.  It has taken me back to the days when our children loved to ransack the dress-up basket to produce an ever-amusing parade of sartorial splendor!  (I'd show you photographs but they might have to kill me.)  All this led me a few months ago to a dedicated internet search for the best (and best deal) in children's costumes.  And Readers, we have a winner!


Snow White  *NEW* Teal Fairy - Click Image to Close 


All of these images are from are from the Little Adventures website.  The business was started ten years ago by two mothers in Utah who were themselves looking for high-quality, affordable dress-ups to buy.  When they couldn't find any to buy, they began to sew and sell their own designs.  You'll find Belle, Cinderella, Sleeping Beauty, Ariel, Jasmine,  Rapunzel, Snow White and others here.  What I like about these costumes is..


Pink Parisian PrincessYellow Beauty - Click Image to Close


They are so pretty!  (And modest too.)  Because the bodices are made from a stretch velvet, the children quickly learn how easy it is to dress and undress themselves - there are no buttons or zips or even velcro to worry about.  All the clothes are machine washable.  The fabrics are light and cool for our climate.  Once ironed, I've found them to be crease-resistant.  (I know, no one else will probably even care about this, but I'm happy :)  None of the fabrics are the least bit itchy, and the inner seams are well finished.  Various reviews highlight that they fit well, are comfortable, long-lasting, well-made - in short, as the Little Adventures company promises: they are 'affordable, comfortable, washable and adorable'!


*NEW* Royal Rapunzel - Click Image to Close   


(The price for each of these outfits is $29.99 plus postage.  Although you can find a few of these costumes on the odd Australian site, I've found it much cheaper to buy directly through the US site, where there is also access to the full catalog. You can see what they have available on their wholesaler's catalog here.  This won't show the prices, but you can view the entire range.)


Since these beautiful costumes and their various accessories arrived, we have hosted many very happy play dates with several different lots of children.  Although I did not think the boys would be too bothered, I've found that I completely underestimated their interest, and have since ordered some boy costumes for them to enjoy too.


Who doesn't love getting dressed up occasionally?