Showing posts with label Around the House. Show all posts

Friday, January 11, 2013

How to Make a Great Beanbag Floor Cushion


This post is possibly less about how to make a beanbag floor cushion, (since that is really quite easy), than it is a testimonial about how very useful they can be in your home! :)


I first made two large beanbag floor cushions for our home about 15 years ago -  I had found a couple of tapestry pieces I liked at the time and was looking for a way to use them.  With our large family, (7 children plus 2 parents = 9), plus many assorted friends on occasion = not enough seating for everybody!  - it seemed like a good idea, and the rest, as they say, is history! :)

We have kept the two cushions stacked one on top of the other in our family room, so that they are like an extra seat.  We use them flat, on their own or in a stack of two; flat or upended onto their side - and among other things have found them useful for:

...    extra seating.  They take one or two, and up to three or four bottoms at a time, as needed :)
...    somewhere to put up our feet!
...    something to lay back against while lounging on the carpet
...    a safe and comfy nest for a new baby
...    a great way to elevate a broken toe or sore feet
...    something for the children to jump on - especially from moderate heights :)
...    a great recliner to sleep somewhat upright with after dental surgery
...    as padding on the bedroom floor of a toddler learning not to fall out of bed!
...    easily portable seating to take into the lounge room as needed, or even to loan out to friends for parties :)
...    something to lay over for postural drainage or, more usually, to drape over to read a book or watch a movie

In recent years I have made a set of these beanbag cushions for three of our married children, most recently as a Christmas present for Bethy. Here's what you need for each single cushion if you would like to make these for your home:

  • 2 x 93cm squares of a light and strong fabric for the inner lining/insert.  (I usually use a poly-cotton fabric.  This fabric won't be seen.)
  • 2 x 93cm squares of outer upholstery fabric.  (I used a light corduroy for the cushions I made recently.)
  • 1 metre of medium to heavy-duty zip
  • polystyrene beanbag filling (about 120 litres for each cushion?  The beans flatten over time and I have added to our cushions probably about 4 or 5 times over the years.  I haven't replaced beans, just added them.  It's nice to have a bit of 'squish' in your cushions, but you might like more beans if you like them sturdier.)  


Directions - 


To make the inner lining/insert:  
  • With right sides facing, sew the two pieces of fabric together along three and a half sides (leave a gap of about 30cm (1 ft.) in the centre of one side.)  Use a 1.5cm seam allowance throughout.
  • Strengthen and finish the seam well, with at least one more line of sewing about 1cm. from your first.  (You don't want the beads to escape from a popped seam.)
  • Turn and fill with beans through the hole you left.  Hand-sew the remaining seam closed by folding the seam ends over a couple of times, and sewing well with double thread.  I use a brightly coloured thread so that it is easy for me to unpick it when I need to add more beads.

To make the outer cushion cover:
  • With right sides together, sew along one side of the cushion only, using a 1.5cm seam allowance and a long basting thread that is easy to unpick.
  • Turn over and open out and flatten the seam allowance.
  • Pin your zip (I used continuous zip), all the way down the seam line, matching the centre of the zip to the centre of the seam. 


  • Sew the zip in once all around, and then once more, about .5cm-1cm away from your first line of stitching, to strengthen it.  Unpick the basting line - you should find that the seam lines up perfectly over the zip.


  • With right sides together, sew remaining three sides of the covers, then sew again 1cm away, to reinforce.
Insert the cushion into the cover, taking care to push it all the way into the corners. 

You're done!

Really, the only ticklish parts to doing this are:  1. filling the bags with beans.  (I challenge you to not let any of them escape!  You ought to do a good vacuum when you have finished to make sure little fingers don't put them into little mouths and perhaps inhale them), and 2.  Sewing the thicknesses of fabric, if you are dealing with upholstery material.  Especially over the zip might be hard.  If so, I suggest you just sew what you can and finish near the zip with some hand-sewing.  


DSC_0821
(Don't you love this patchwork floor cushion?  You can find a tutorial for it here.  I love the colours! :)


Of course, you could also go larger!


Tuesday, November 13, 2012

How Hard Can It Be? - DIY Upholstery


Have you ever noticed how surprisingly easy a lot of things are if you will just jump in and give them a go?   ...And stop thinking that you can't do something - at least until you are proved wrong!?

Have you ever tried upholstery?  I hadn't either, but I've written my instructions for covering these lounges, which was simpler than I thought it would be.  Below that are simple directions for covering a chair - something that anyone can easily do, no sewing required :)


These two lounges (you can see them a bit more here) were as cheap as chips when we bought them over twenty years ago - a few hundred dollars for the two of them.  Although they look identical, one is a pull-out sofa bed.  They were originally covered with a very cheap calico which, naturally enough, lost whatever good looks it used to have after spending several years with our several children.  It never really occurred to me to replace the lounges because we couldn't afford it at the time, so I looked around for some inexpensive upholstery fabric.  I found this light-cream coloured, raised and tufted material at an end-of-roll warehouse and bought about twenty metres very cheaply.  

I had in mind to make some kind of slip-covers - something that I could remove for washing.  I'd never done anything like this before, but how hard could it be?  I have resisted the temptation to find you a great YouTube video that might show how to achieve this because,..  well, it's probably going to seem a bit more complicated than the way I did it, so I thought I'd just tell you what I did instead.

I could have tried to remove the old covers to use as a pattern, but I decided that it would be easier working with the original fabric 'shell' still on, than with uncovered foam.  I used some un-needed cheap cotton fabric that I had at home to make my own pattern by doing this:


1.  I took off the loose cushions, then took note of the placement of the seams in the original covered lounge.
2.  Using my pattern fabric, I rough-cut larger than needed panels to match each of the panels on the lounge.
3.  One panel at a time and using basic sewing pins, I pinned each rough-cut pattern fabric panel against the original lounge panel, stretching lightly to keep it smooth.  (Keep the pattern fabric square to the grain of the fabric so that the material itself doesn't stretch.)
4.  Using a marking pen, I fairly carefully and lightly (so it wouldn't mark the lounge) drew the seam lines on the lounge (I could feel them through the fabric), onto each pattern piece.  (You could use a fabric marking pen for this, but it fades off after a short time.)
5.  After unpinning I, again pretty carefully, added a seam allowance around each panel and cut each of the pattern panels out, following my marking lines.
6.  (At this point, I tacked a few pattern pieces together, to see if they fit the lounge and to see if I seemed to be on the right track.  They seemed like they would be ok.)
7.  I also made pattern pieces for the four loose cushions.
8.  Before making any cuts on the good upholstery fabric, I carefully planned out the fabric to make sure that everything would fit and that the fabric pattern would work well on the lounge.   However, to save money on the good fabric, I planned to cut the pattern pieces that wouldn't be seen from heavy calico, instead of the upholstery material.  (eg  On the seat under the cushions, and on the back of the lounges.)  I also planned to cut some long narrow strips of the fabric to make my own matching binding.  (You can read how to do that here.)
9.  Using the patterns I had made, I now cut out the panel pieces from my upholstery fabric. (Again - I made sure that I had planned out all the pieces on the good fabric before I made the first cut!)
9.  Now it was just like a big jig-saw that I put together.  It was large and unwieldy but not too hard to sew.  Inserting the piping is always a little bit tedious and I actually got lazy with it (and I think was trying to get it done quickly for a party), so I never did do the piping around the front of the arms, unfortunately, since it would have looked better if I had.  You can see in the photos that I put it around the front of the cushions, up the centre back seam and along the front floor hem.  (Note: you will want to use a heavy gauge needle and upholstery thread in your machine.)
10. At the back of each lounge I used velcro down each side for easy removal of the covers for washing.  (I also used velcro to create an opening on the seat of the sofa bed, so the pull-out bed could be used without removing the lounge cover.)

I had no idea when I started if this was going to actually work..  But was a bit amazed and quite delighted to find that the covers fit like a glove, and peel off and on as needed.  Voila!  And Hurray! :)

We've had these covers on now for about 15 years, and so far they come up like new after each wash.  I wash them about three or so times a year.  I put them back on the lounge when they are still quite damp, and they fit very snugly and still do service after all this time.  (The photo above was from earlier this year.)


A much simpler project again is something like this chair.  Again, we bought this cheaply because it had only a basic calico cover.  Once I found some upholstery fabric I liked, (this was from an off-cut of a blind I made for our girls' room), nothing could have been easier:

1.  I worked out a placement for the flower pattern that I liked.
2.  I cut out a slightly larger than needed piece of fabric for each of  the chair panels.  I stretched and pinned these over the original fabric.
3.  Using a staple gun I started to attach the upholstery fabric to the chair by working all around each panel at the same time: one staple in one side, then one in the opposite side, then the other two sides, then each of the corners, etc.  (To keep the fabric square and tight.)
4.  Eventually, I stapled closely around all the edges, then closely trimmed off the excess fabric.


5.  Using a matching tape trim, you then glue the trim over the staples to cover them.   Easy!  

I did this chair about 10 years ago so I don't remember exactly how long it took to do but it wasn't long.  When the arm pieces got dirty after a few years, I pulled out my off-cuts and re-did them.


I'm sorry that I have such a terrible photo of these, but these are the dining chairs I've also covered (they're currently in storage or I could have tried for better pictures).  These took a bit of sewing and then stapling onto the under-base of the chairs.  It wasn't hard!


The best thing about trying out your own upholstery skills is that you can make your own fabric selections for your furniture. Have you ever found a great piece, but don't like the colour?  Maybe just have a closer look to see if it would be easy for you to recover with a fabric you like more..


leopard 

http://anakral.blogspot.com.au

Once you get the hang of it..


upholstery


You might not want to stop!


floral
http://anakral.blogspot.com.au


Mademoiselle chairs by P Starck for Kartell
http://anakral.blogspot.com.au


And don't forget - there are more than just chairs out there! 


What a great example! The upholstery on this is SO simple - it's the shape of the headboard and the large repeat fabric that makes it so fabulous. Nice!


Happy Upholstering! :)


Thursday, August 23, 2012

Decorating the Nursery - Girl!!

I was talking to Mum today, about how much I love dressing our little girls in pink.

a)  People don't ask me how my son is
b) Baby girls dressed in pink look so sweet and pretty and feminine!!

When I have a son (Yes, I'm sure this will happen one day) I will love dressing him in blue.  I am completely confident about that as well :)  

I will also want to do up a fun little 'boy' nursery if it is a boy!! If it is a girl, she will once again be handed down at least the basics from her big sisters.  

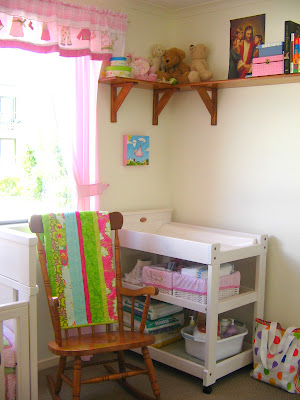
Here's what we did for Maggie:


One of the things I really wanted in our nursery (and which I want for all of our children's rooms) was a picture of the Saviour - preferably a sweet one of Him with some children.  Mum and Dad brought me this one back from the LDS Church Distribution Centre in the States ... or maybe from Deseret Book??  (I don't know which, but they are here and here and you can find beautiful art on both!)


My lovely friend Kaili  painted the gorgeous picture above the change table!! :)  


I painted some little canvases and attached them with ribbon to hang up above the chest of drawers - I copied the cute pattern which was on the cot set and curtains :)  The cot sheet set/curtains etc. are a a line from Kidsline called 'Clothesline'.  If you google Kidsline Clothesline you'll be able to find it.  I have been really happy with it! :)


Over time things have changed a little - our rocking chair didn't live for too long - it was older and it (we strangely have no idea how) ended up with a giant crack down the seat!  So that's not out at the moment, and I miss the beautiful quilt Mum made splashing its beautiful colours in there!  We also (during Ana's time) swapped around the cot and the chest of drawers, so the drawers are under the framed picture of the Saviour, and the cot is under the canvases I painted (and yes, Ana is still sleeping under a canvas that says 'Maggie'!!).  The things on the bookshelf are also a little different, but we didn't change too much when Ana was born and we whisked Maggie into her newly created bed/toy room!!!

Decorating rocks my little socks :)

Thursday, August 2, 2012

Happy Organising!! :)

This morning I saw an ninemsn health article while I was browsing the news, that said that having clutter around is an 'energy stealer'.  I wanted to quote her (I think organisation definitely makes me feel more energised!!) so I thought I'd look up the referenced sources' credentials, and it made me laugh to see she has 'Expert membership status of the Australasian Association of Professional Organisers (AAPO), and graduated from Australia's first accredited 'EXPERT' Professional Organiser Narelle Todd's Professional Organiser Training Program (as well as a degree in home ec and a bunch of other stuff).  I was somewhat diverted to hear there was such a program, so I looked that up too - it's very serious and very expensive, and I had no idea that there were such rigorous qualifications available for being great at organising!!!! :)

But that's all just interesting side notes.  I was interested in the article because post sickness, I have been able to get back to trying to reorganise and de-clutter our little house!!!  

I started a few months ago, and although I don't have 'before' photos for my bedside table, imagine from the rest of the examples that it was an absolutely overcrowded pigsty!! :)


Now, it's not :)

Here's a 'before' and 'after' of our ribbon/wrapping drawer:


And one of Ana's drawers...


(a lot of it ended up hanging up!)

And in the last few days I've been focusing on what were my VERY messy bathroom cupboards and bench.

Before and after:


Before:


and after:


Before and After


Although it's a struggle to get this stuff done (the girls seem to DESPERATELY need attention at just the moment I've pulled everything out of any given cupboard or drawer, and seem to time the 'wake up' part of their naps to the same moment) sometimes, it feels a LOT better when it IS done!!!

From my obviously vast experience (having now proved I've cleaned at least 5 or so spaces in the last 3 months), here are my top tips for organisation:

(please note I do not have expert membership in the AAPO, and have yet to complete any professional organisation courses... :))
  1. Don't be afraid to throw things away!!!  Sometimes we hold on to things for ages, 'just in case' we'll randomly need to use them in the future.  If you haven't used it for a year, chances are you won't need it for the next 10 or so!  Sometimes these things are only worth $2 anyway, and I've realised it's worth that possible $2 future re-buy to me, to not have to store it for the next 10 years.  Also, we get given a lot of gifts in our lifetime, and some of them we'll never use, and keep them out of guilt.  I've decided that it's better to throw it in a Vinnies bag and let someone else who may actually use it, get a chance to have it!!  I LOVE throwing away vast amounts of things I've been holding onto for way too long.
  2. Clean as you go.  Make sure you clean (dust, etc.) every shelf/cupboard you pull everything out of, before you put stuff back in.  It just makes everything feel better!
  3. Compartmentalise - use containers, boxes and bags to divide things into categories.  This helps things stays neat, and makes it easier for you to find things in future!
  4. Label stuff! - Even though none of these photos show labels, I'm a big fan!! - Because as much as you think you WILL remember where you put EVERYTHING, you might not.  And the people who you live with don't read your mind, so this'll make it easier on everyone!!  I just don't have anything cute and lable-y at the moment to use lol :)
  5. Do a little bit every day.  Even if it's just your ribbon and wrapping drawer :)  Organising and de-cluttering are addictive.  If you do something little each day, you'll want to keep going, and you'll feel clean in body and mind!! :)
This blog motivated me HEAPS in getting better at being organised, and although she's been writing about other things lately, there are a bunch of cute organisation posts that I read back to sometimes to give me that little 'kick' again :)

Happy Organising!!! :)

Thursday, July 12, 2012

Table Centrepiece

A little while ago now we got new couches (one of the single most exciting 'homemaker' moments of my life!), and changed the colours in our living room a little to liven things up a bit!!  On our nearby dining table I had gotten extremely sick of the yucky centrepiece and wanted to tie in the new colours in the couches (bright!), so I bought some of those cheap cane balls from cheap shops, and painted them!  


We'd been given a white cane bowl second hand, and that's actually a placemat underneath them!  I am a terrible photographer and it all looks very dark, but we like our little table centrepiece, our living area is fresh and bright, it was VERY cheap and easy to put together, and ties the eating area to the rest of the living room nicely :)


I'm always kind of at a loss when it comes to table centrepieces - does anyone have any fabulous ideas??  It's been a few years, we're almost ready for an update!! :)